Background
When i first installed the garden tap i had in mind the posibility of installing an automatic watering system. Initially i installed watering hose('leakey hose') in the front garden beds and fed this from the garden tap. If i wanted to fill a watering can to water plants or seedlings in the greenhouse for example i had to wait or interrupt the watering of the front garden plants. I looked into buying a manifold and there are a number available some made from plastic and others made from brass ranging in price from £5-£20. They generally have between two to four outlets. These all had a number of problems:
1. They did not allow automatic watering units to be installed due to the shape and spacing of the valves or if they did allow a unit to be attached the valve next to it could not be used.
2. If one valve failed then the entire unit had to be replaced.
3. Some manifolds are designed to attach directly to the tap which puts considerable strain on the tap body and mounting particularly when one or more hoses are attached.
I am always keen to implement the ethos of 'reduce,reuse, recycle' so i came up with the idea of making my own valve manifold using washing machine valves and copper pipes all well proven and readily available components. My system has a number of advantages over the commercially available ones.
1. The spacing between the valves can be designed to allow automatic watering units to be correctly mounted and spaced.
2. If one valve fails it can easily be replaced.
3. The manifold is mounted independently of the tap and connected to it using standard garden hose parts.
4. The manifold can be be firmly mounted to a wall or back plate using standard plumbing mounting clips and spacers.
5. The manifold can be designed to have as many outlets as required but more than six valves would become quite bulky and the water pressure drop due to all of these operating at the same time would become significant.
At the end of the gardening season and before the temperatures drop too low overnight i disconnect the manifold from the tap, undo the plastic clips securing the manifold, open all the valves to drain any water in the pipes and store safely in the greenhouse. I also disconnect the tap and bleed any water using the bleed screw(not all taps have this) on my tap to avoid freezing damage over winter and store it in the greenhouse. When next spring comes round it takes just a few minutes to connect the manifold and tap back together.
Prototype Manifold System
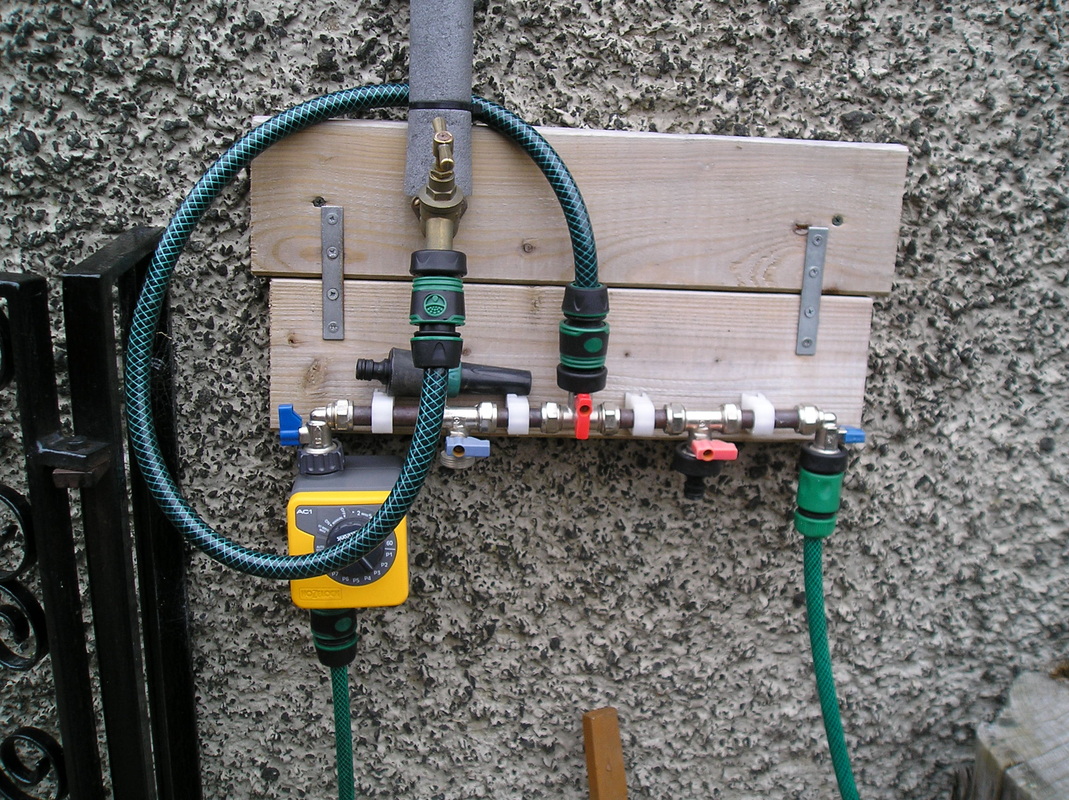
Prototype water manifold system.(Click to enlarge.)
This shows the early prototype i have been using for the past couple of years. I put this together using some offcuts of decking and washing machine valves connected together using some bits of spare 15mm copper pipe. The objective was to prove that the concept would work, was reliable and would provide repeatable consistent performance.
The tap is a high end model with double check valves('non return') to ensure that no water that has left the mains system can re-enter it contaminating the mains supply.
The valves are spaced to allow the attachment of automatic watering valves as shown in this picture. The spacing also allows the other valves to be used to fill watering cans, attach hoses etc.
The left most valve currently waters the front garden via a hose running up the side of the house hidden behind planters. The hose connects to a set of similar valves in the front garden where watering hoses('leakey hoses') are laid out in the flower beds between the plants.
The right most hose provides water to the greenhouse via a hose running along the back of the house hidden behind planters. The hose connects to a set of similar valves inside the greenhouse via a non return valve where an automatic watering system is installed during the summer months using a micro-irrigation system and a drip feed network of pipes. The non return valve ensures no contaminated water from the greenhouse can return to the mains supply. This is particularly important for a greenhouse where the humid environment can allow mould and fungus to grow in the pipes and it is essential that this does not get back to the mains water supply.
The valves and copper pipe sections are held in place using 'Talon' plastic clips and spaces which ensure the correct spacing for the automatic watering valves and the back plate.
