Background : Desk Light Repair/Re-Purposing
I purchased an 'angle poise' type desk light in 2002 from a well known high street catalogue shop. It was good value for money and served me well, however in 2010 a few cracks in the base had got to the point that the lamp could no longer remain safely upright. The problem was simply that with age, heat, and the simple original low cost design the plastic had perished and cracked.
It was a shame to discard the light because other than the broken plastic parts it was a perfectly usable unit with many years of usable life. I decided to find a simple low cost solution to make the light usable again.
It was a shame to discard the light because other than the broken plastic parts it was a perfectly usable unit with many years of usable life. I decided to find a simple low cost solution to make the light usable again.
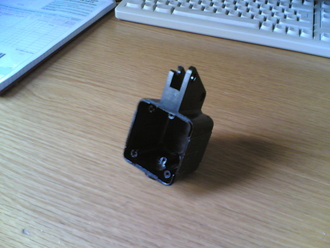 Damaged original lamp base casing which contained transformer/ballast.
The light was originally mounted on this small plastic housing. This had three major functions.
- It supported the upper sections the 'arm' of the light.
- It contained the transformer/ballast unit to drive the fluorescent light.
- It provided the mounting point to the base and allowed the lamp to pivot on the base of the lamp.
Sadly over time the plastic of the upper mounting holes cracked and broke, the case body cracked and eventually the tail that provided the mounting and pivot broke off. This was not due to rough use or mishandling simply the low cost plastic parts aging and failing due to heat.
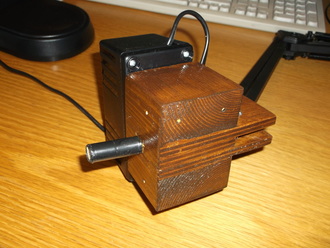 New wooden base with PSU case and pivot.
I made a simple base from a couple of offcuts of wood a few pieces of plywood and some wooden dowelling.
The offcuts and plywood were cut and glued together creating a support bracket for the light frame. Holes were drilled to allow the frame to be mounted on top and a hole was drilled in the base to allow the wooden dowel to be glued in place. Some varnish stain was applied to make the base a litle more attractive.
The entire light is mounted and pivots on the wooden dowel. A few turns of black insulating tape were wrapped around the dowel to ensure a snug fit in the base.
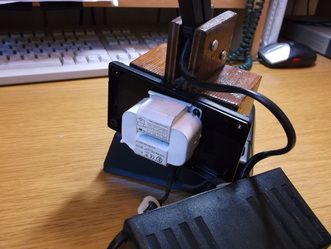 PSU case with transformer/ballast & wiring installed.
A plastic power supply unit(PSU) case costing a few pounds was purchased from a local electrical components supplier. A few holes were drilled in the base and it was secured to the rear of the wooden block as shown in this photograph. A PSU case with ventilation slots was chosen to ensure safe low temperature operation.
The transformer/ballast which drives the light was then screwed in place and the electrical wiring correctly routed through the entry and exit grommets.
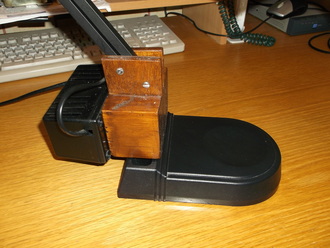 Completed base and PSU installed and lamp re-assembled.
The dimensions of the case and wooden block base had been carefully selected so that the base screws of the case were exposed and could be easily accessed for repairs etc.
The completed base can be seen in this photograph.
After 2-3 hours of work I now have a safe working lamp that is stable and sgould give many more years of service.
