Background : Greenhouse Replacement
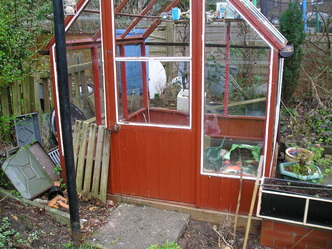
My uncle built his greenhouse more than 35 years ago. It was a traditional wood built frame with putty glazed windows. It served him well producing good crops of bedding plants tomatoes and cucumbers. Over the years it required some maintenance but that was understandable given it's construction. All it really needed was some paint and replacement putty every few years to keep the rot at bay.
Unfortunately the two storms of December 2011 and January 2012 revealed weaknesses brought on by rot hidden from view and after the January 2012 storm the greenhouse had developed a slight but noticeable tilt to one side. The frame was still quite rigid but it was only a matter of time before the damage would get worse. Closer examination of the greenhouse revealed that base made from recycled railway sleepers had rotted in a number of places. It was easy to break away checks of rotten wood by hand. It was possible to repair the greenhouse but it would require alot of work and it was possible that considerably more rot would be found.
My uncle decided to treat himself to a new greenhouse so we set off one Saturday afternoon to see what was available. The greenhouse had to fit on the current site if at all possible, meaning a greenhouse of 6 feet x 6 feet was required. If this was not possible then an 8 feet x 6 feet could be fitted by removing and re-siting a clothes pole.
The original greenhouse was built in the late 1970's and early 1980's. Over the years it had been upgraded and improved but ultimately the wood rot could not be kept at bay. Rather than breakup and demolish the greenhouse which would scatter glass and wood all over the lawn and make transporting the debris out to a skip difficult the decision was taken to carefully remove the glass and then locate the securing screws and bolts and attempt to dismantle the greenhouse into as few parts as possible. In the end it was possible to dismantle it into 2 x roof panels, 2 x side panels, 2 x end panels and a door. As the greenhouse is approximately 60 yards from the street and approximately 50 feet above the street level at the very top of the garden this saved a considerable amount of back and forth with debris.
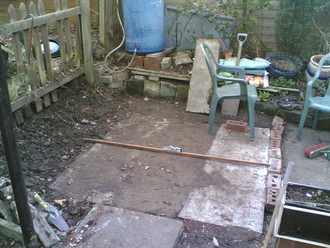
After the old greenhouse was removed the base site could be examined. The good news was that there was already some sort of rough concrete base in place although it was in a number of sections and on a number of different levels.
The base was cleared and a rough level marked out using wooden pegs. This gave an indication of the amount of infill and sand required to lay the slabs for the base.
After some calculations for sand, slabs and wood we set off to the builders supply yard to order what was needed. Because of the difficulty accessing the site from the street it was important that we got the figures correct as it required a lot of effort to get all those heavy items up to the greenhouse and we did not want to carry it all in only to find we had to carry some of it out again because we had over ordered.
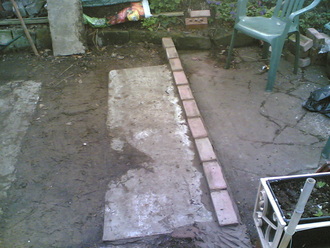
We had to wait a couple of days for the sand and slabs to be delivered so we made good use of the time preparing the site for the really hard heavy work. We needed a good edge to support the slabs and stop the sand washing out so we recycled some bricks to provide a good solid edge.
This was my first attempt at brick laying and in the future as long as the wall required is only one brick high i should be ok!
This was my first attempt at brick laying and in the future as long as the wall required is only one brick high i should be ok!
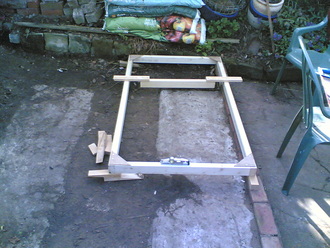
Over the weekend waiting for the sand and slabs to be delivered i built this simple jig to be used to get the sand at the correct level for the slabs. The jig is set on the ground and wedges are used to adjust each corner so that the underside of the jig is at the required height for the sand. A spirit level is used to ensure the jig is level in all directions. The sand is then put inside the jig and packed down until it is close to the underside of the jig. More sand is added and the sliding tamper bar is used to finely set the level of the sand. The jig was designed to be at least the length of two slabs and one and a half times the width of the slab so that the original sand depth could be used as the reference level for the next row of slabs.
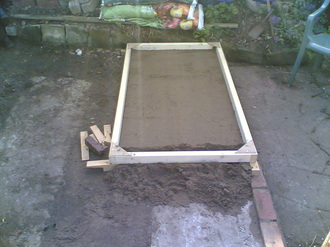
Great care was taken to get the first section of the sand base level and compact as all other work will be referenced from this point.
The beauty of this type of approach is that once a section of sand is prepared the slabs can be directly laid with little or no lifting and adjusting of the sand level as can happen when the slabs are laid one at a time.
Because of the slope of the site considerably more sand was required on one side than on the other.
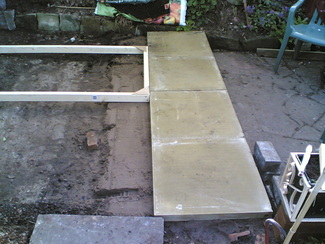
After the first row of slabs were laid the protruding section of sand to the left of the slabs was at the correct level. This was used as the reference for the second row of slabs to be laid at right angles to the first row.
The jig is laid on the sand and the other end and sides are supported using wedges to get it level. When this is complete the jig is filled with sand as before and packed down using the sliding tamper bar.
The jig is laid on the sand and the other end and sides are supported using wedges to get it level. When this is complete the jig is filled with sand as before and packed down using the sliding tamper bar.
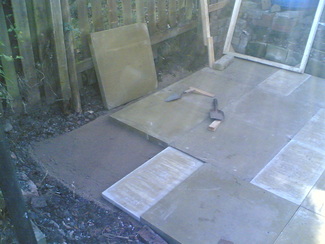
The process is repeated for each row of slabs until the base is complete. In this particular project half size slabs were used to avoid the need to cut slabs and because of the limited available space on the site. These half size slabs(see photo) are slightly thinner than the full size slabs so the sand depth had to be manually increased to accommodate them.
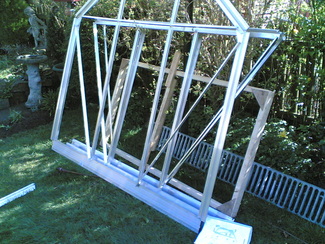
Once the slab base was complete the frame of the greenhouse was constructed. This particular model requires that the sides and ends are assembled first then gradually connected together on the slab base then all tied together by installing the roof struts.
It was a fiddly process ensuring that plates and struts were layered correctly and the correct bolts were used at the correct point. It was well worth taking time to read the instructions several times before fixing any bolts in place.
Fortunately it happened to be the warmest last week of March on record so it was pleasant to be outdoors working. In the past i have done this kind of project in cold weather and your fingers soon get very sore handling all the cold metal and small nuts and bolts.
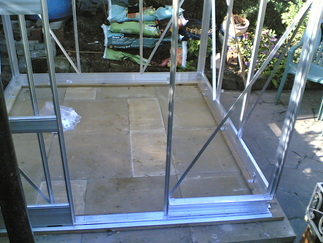
After all parts of the frame were assembled, a wooden base was constructed made from pressure treated decking planks. The decking was secured to the slabs using M6 x 50mm hex head stainless steel coach screws and 25mm diameter stainless steel 'penny' washers to spread the fixing force and minimise damage to the decking wood. Due to the nature of the base on this greenhouse model the hex nut head and penny washer had to be countersunk into the wood so that the greenhouse base could sit flush on the wood.
When the wooden base had been completed the greenhouse frame was placed on top, squared and fixed in place using the brackets provided and M6 x 25mm hex coach screws. Before proceeding to install the glass, all frame bolts were checked for correct seating ad tightness.
When the wooden base had been completed the greenhouse frame was placed on top, squared and fixed in place using the brackets provided and M6 x 25mm hex coach screws. Before proceeding to install the glass, all frame bolts were checked for correct seating ad tightness.
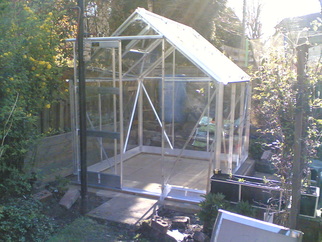
The glass was installed starting in the far corner working up towards the roof panels. The door was then installed and the glass panels fitted to it. The mounting wheels and rails were adjusted to ensure a good fit and smooth operation in both directions.
The final task was to install the automatic opening roof vent.
The entire job from the start of demolition of the old greenhouse to completion of the new one took six days. A few months later the watering system was plumbed in from the water storage barrel via a hole drilled in the aluminium frame base and electricity was installed to provide heat and lighting.
